|
对于最新的稳定版本,请使用 Spring Security 6.4.3! |
OAuth 2.0 资源服务器 JWT
JWT 的最小依赖项
大多数 Resource Server 支持都收集到spring-security-oauth2-resource-server.
但是,对解码和验证 JWT 的支持在spring-security-oauth2-jose,这意味着两者都是必要的,以便拥有支持 JWT 编码的 Bearer Token 的工作资源服务器。
JWT 的最低配置
使用 Spring Boot 时,将应用程序配置为资源服务器包括两个基本步骤。 首先,包括所需的依赖项,其次,指示授权服务器的位置。
指定 Authorization Server
在 Spring Boot 应用程序中,要指定要使用的授权服务器,只需执行以下作:
spring:
  security:
    oauth2:
      resourceserver:
        jwt:
issuer-uri: https://idp.example.com/issuer哪里idp.example.com/issuer是issAuthorization Server 将颁发的 JWT 令牌的声明。
Resource Server 将使用此属性进一步进行自我配置,发现授权服务器的公钥,并随后验证传入的 JWT。
要使用issuer-uriproperty 中,还必须是idp.example.com/issuer/.well-known/openid-configuration,idp.example.com/.well-known/openid-configuration/issuer或idp.example.com/.well-known/oauth-authorization-server/issuer是授权服务器支持的端点。
此端点称为 Provider Configuration 端点或 Authorization Server Metadata 端点。 |
就是这样!
创业期望
使用此属性和这些依赖项时,Resource Server 将自动配置自身以验证 JWT 编码的不记名令牌。
它通过确定性启动过程来实现这一点:
-
查询 Provider Configuration 或 Authorization Server Metadata 端点以获取
jwks_url财产 -
查询
jwks_url终端节点 -
配置验证策略以查询
jwks_url对于找到的算法的有效公钥 -
配置验证策略以验证每个 JWT
iss索赔idp.example.com.
此过程的结果是,授权服务器必须启动并接收请求,Resource Server 才能成功启动。
| 如果 Resource Server 查询授权服务器时授权服务器已关闭(给定适当的超时),则启动将失败。 |
运行时预期
应用程序启动后,Resource Server 将尝试处理任何包含Authorization: Bearer页眉:
GET / HTTP/1.1
Authorization: Bearer some-token-value # Resource Server will process this
只要指定了此方案,Resource Server 就会尝试根据 Bearer Token 规范处理请求。
给定格式正确的 JWT,Resource Server 将:
-
根据从
jwks_urlendpoint 并与 JWT 匹配 -
验证 JWT 的
exp和nbftimestamp 和 JWT 的issclaim 和 -
将每个范围映射到带有前缀的颁发机构
SCOPE_.
| 当授权服务器提供新密钥时, Spring Security 将自动轮换用于验证 JWT 的密钥。 |
结果Authentication#getPrincipal默认情况下,是 Spring SecurityJwtobject 和Authentication#getName映射到 JWT 的sub属性(如果存在)。
从这里,考虑跳到:
JWT 身份验证的工作原理
接下来,让我们看看 Spring Security 用于在基于 servlet 的应用程序中支持 JWT 身份验证的架构组件,就像我们刚刚看到的一样。
让我们来看看JwtAuthenticationProvider在 Spring Security 中工作。
该图详细介绍了AuthenticationManager在 Reading the Bearer Token works 中的数字中。
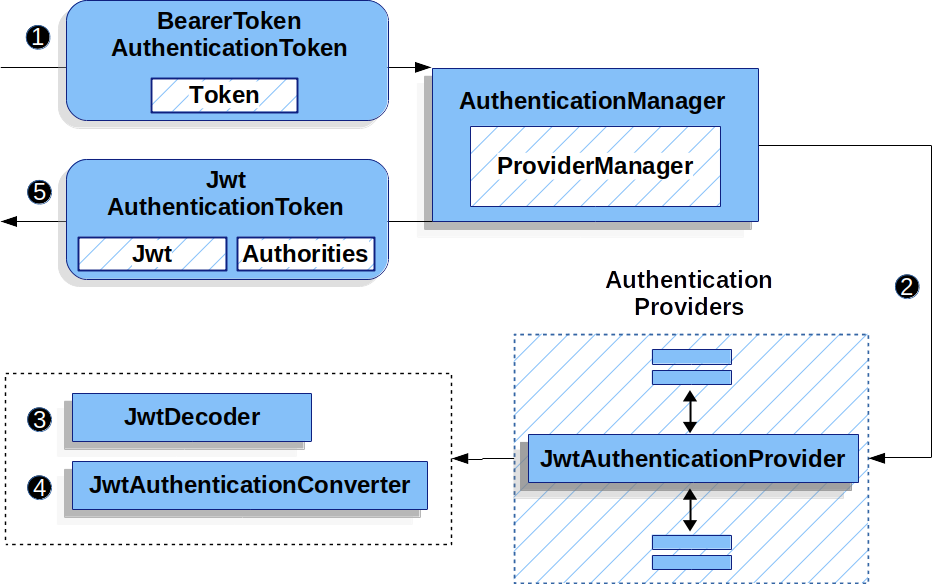
JwtAuthenticationProvider用法![]() 身份验证
身份验证Filter从 Reading the Bearer Token 传递一个BearerTokenAuthenticationToken到AuthenticationManager它由ProviderManager.
![]() 这
这ProviderManager配置为使用 AuthenticationProvider 类型的JwtAuthenticationProvider.
![]()
JwtAuthenticationProvider解码、验证和验证Jwt使用JwtDecoder.
![]()
JwtAuthenticationProvider然后使用JwtAuthenticationConverter要将Jwt转换为Collection的授予权限。
![]() 身份验证成功后,
身份验证成功后,Authentication返回的 类型为JwtAuthenticationToken并且有一个主体,该主体是Jwt由配置的JwtDecoder.
最终,返回的JwtAuthenticationToken将在SecurityContextHolder通过身份验证Filter.
直接指定授权服务器 JWK 集 URI
如果授权服务器不支持任何配置端点,或者如果 Resource Server 必须能够独立于授权服务器启动,则jwk-set-uri也可以提供:
spring:
  security:
    oauth2:
      resourceserver:
        jwt:
          issuer-uri: https://idp.example.com
jwk-set-uri: https://idp.example.com/.well-known/jwks.json| JWK 集 URI 未标准化,但通常可以在授权服务器的文档中找到 |
因此,Resource Server 不会在启动时 ping 授权服务器。
我们仍然指定issuer-uri,以便 Resource Server 仍会验证iss对传入的 JWT 的声明。
| 此属性也可以直接在 DSL 上提供。 |
提供受众
如前所述,issuer-uri属性验证iss索赔;这是发送 JWT 的人。
Boot 还具有audiences属性来验证aud索赔;这就是 JWT 的收件人。
资源服务器的受众可以如下所示:
spring:
  security:
    oauth2:
      resourceserver:
        jwt:
          issuer-uri: https://idp.example.com
audiences: https://my-resource-server.example.com您还可以添加这aud以编程方式验证(如果需要)。 |
结果是,如果 JWT 的iss索赔不是idp.example.com及其audclaim 不包含my-resource-server.example.com,则验证将失败。
覆盖或替换引导自动配置
有两个@Bean的 Spring Boot 代表 Resource Server 生成的。
第一个是SecurityFilterChain,将应用程序配置为资源服务器。当包含spring-security-oauth2-jose这SecurityFilterChain看来:
-
Java
-
Kotlin
@Bean
public SecurityFilterChain filterChain(HttpSecurity http) throws Exception {
    http
        .authorizeHttpRequests(authorize -> authorize
            .anyRequest().authenticated()
        )
        .oauth2ResourceServer((oauth2) -> oauth2.jwt(Customizer.withDefaults()));
    return http.build();
}
@Bean
open fun filterChain(http: HttpSecurity): SecurityFilterChain {
http {
authorizeRequests {
authorize(anyRequest, authenticated)
}
oauth2ResourceServer {
jwt { }
}
}
return http.build()
}如果应用程序没有公开SecurityFilterChainbean,则 Spring Boot 将公开上述默认的 bean。
替换它就像在应用程序中公开 bean 一样简单:
-
Java
-
Kotlin
import static org.springframework.security.oauth2.core.authorization.OAuth2AuthorizationManagers.hasScope;

@Configuration
@EnableWebSecurity
public class MyCustomSecurityConfiguration {
    @Bean
    public SecurityFilterChain filterChain(HttpSecurity http) throws Exception {
        http
            .authorizeHttpRequests(authorize -> authorize
                .requestMatchers("/messages/**").access(hasScope("message:read"))
                .anyRequest().authenticated()
            )
            .oauth2ResourceServer(oauth2 -> oauth2
                .jwt(jwt -> jwt
                    .jwtAuthenticationConverter(myConverter())
                )
            );
        return http.build();
    }
}
import org.springframework.security.oauth2.core.authorization.OAuth2AuthorizationManagers.hasScope

@Configuration
@EnableWebSecurity
class MyCustomSecurityConfiguration {
    @Bean
    open fun filterChain(http: HttpSecurity): SecurityFilterChain {
        http {
            authorizeRequests {
                authorize("/messages/**", hasScope("message:read"))
                authorize(anyRequest, authenticated)
            }
            oauth2ResourceServer {
                jwt {
                    jwtAuthenticationConverter = myConverter()
                }
            }
        }
        return http.build()
    }
}
The above requires the scope of message:read for any URL that starts with /messages/.
Methods on the oauth2ResourceServer DSL will also override or replace auto configuration.
For example, the second @Bean Spring Boot creates is a JwtDecoder, which decodes String tokens into validated instances of Jwt:
JWT Decoder
-
Java
-
Kotlin
@Bean
public JwtDecoder jwtDecoder() {
return JwtDecoders.fromIssuerLocation(issuerUri);
}
@Bean
fun jwtDecoder(): JwtDecoder {
return JwtDecoders.fromIssuerLocation(issuerUri)
}
Calling JwtDecoders#fromIssuerLocation is what invokes the Provider Configuration or Authorization Server Metadata endpoint in order to derive the JWK Set Uri.
If the application doesn’t expose a JwtDecoder bean, then Spring Boot will expose the above default one.
And its configuration can be overridden using jwkSetUri() or replaced using decoder().
Or, if you’re not using Spring Boot at all, then both of these components - the filter chain and a JwtDecoder can be specified in XML.
The filter chain is specified like so:
Default JWT Configuration
-
Xml
<http>
<intercept-uri pattern="/**" access="authenticated"/>
<oauth2-resource-server>
<jwt decoder-ref="jwtDecoder"/>
</oauth2-resource-server>
</http>
And the JwtDecoder like so:
JWT Decoder
-
Xml
<bean id="jwtDecoder"
class="org.springframework.security.oauth2.jwt.JwtDecoders"
factory-method="fromIssuerLocation">
<constructor-arg value="${spring.security.oauth2.resourceserver.jwt.jwk-set-uri}"/>
</bean>
Using jwkSetUri()
An authorization server’s JWK Set Uri can be configured as a configuration property or it can be supplied in the DSL:
JWK Set Uri Configuration
-
Java
-
Kotlin
-
Xml
@Configuration
@EnableWebSecurity
public class DirectlyConfiguredJwkSetUri {
@Bean
public SecurityFilterChain filterChain(HttpSecurity http) throws Exception {
http
.authorizeHttpRequests(authorize -> authorize
.anyRequest().authenticated()
)
.oauth2ResourceServer(oauth2 -> oauth2
.jwt(jwt -> jwt
.jwkSetUri("https://idp.example.com/.well-known/jwks.json")
)
);
return http.build();
}
}
@Configuration
@EnableWebSecurity
class DirectlyConfiguredJwkSetUri {
@Bean
open fun filterChain(http: HttpSecurity): SecurityFilterChain {
http {
authorizeRequests {
authorize(anyRequest, authenticated)
}
oauth2ResourceServer {
jwt {
jwkSetUri = "https://idp.example.com/.well-known/jwks.json"
}
}
}
return http.build()
}
}
<http>
<intercept-uri pattern="/**" access="authenticated"/>
<oauth2-resource-server>
<jwt jwk-set-uri="https://idp.example.com/.well-known/jwks.json"/>
</oauth2-resource-server>
</http>
Using jwkSetUri() takes precedence over any configuration property.
Using decoder()
More powerful than jwkSetUri() is decoder(), which will completely replace any Boot auto configuration of JwtDecoder:
JWT Decoder Configuration
-
Java
-
Kotlin
-
Xml
@Configuration
@EnableWebSecurity
public class DirectlyConfiguredJwtDecoder {
@Bean
public SecurityFilterChain filterChain(HttpSecurity http) throws Exception {
http
.authorizeHttpRequests(authorize -> authorize
.anyRequest().authenticated()
)
.oauth2ResourceServer(oauth2 -> oauth2
.jwt(jwt -> jwt
.decoder(myCustomDecoder())
)
);
return http.build();
}
}
@Configuration
@EnableWebSecurity
class DirectlyConfiguredJwtDecoder {
@Bean
open fun filterChain(http: HttpSecurity): SecurityFilterChain {
http {
authorizeRequests {
authorize(anyRequest, authenticated)
}
oauth2ResourceServer {
jwt {
jwtDecoder = myCustomDecoder()
}
}
}
return http.build()
}
}
<http>
<intercept-uri pattern="/**" access="authenticated"/>
<oauth2-resource-server>
<jwt decoder-ref="myCustomDecoder"/>
</oauth2-resource-server>
</http>
This is handy when deeper configuration, like validation, mapping, or request timeouts, is necessary.
Exposing a JwtDecoder @Bean
Or, exposing a JwtDecoder @Bean has the same effect as decoder().
You can construct one with a jwkSetUri like so:
-
Java
-
Kotlin
@Bean
public JwtDecoder jwtDecoder() {
return NimbusJwtDecoder.withJwkSetUri(jwkSetUri).build();
}
@Bean
fun jwtDecoder(): JwtDecoder {
return NimbusJwtDecoder.withJwkSetUri(jwkSetUri).build()
}
or you can use the issuer and have NimbusJwtDecoder look up the jwkSetUri when build() is invoked, like the following:
-
Java
-
Kotlin
@Bean
public JwtDecoder jwtDecoder() {
return NimbusJwtDecoder.withIssuerLocation(issuer).build();
}
@Bean
fun jwtDecoder(): JwtDecoder {
return NimbusJwtDecoder.withIssuerLocation(issuer).build()
}
Or, if the defaults work for you, you can also use JwtDecoders, which does the above in addition to configuring the decoder’s validator:
-
Java
-
Kotlin
@Bean
public JwtDecoders jwtDecoder() {
return JwtDecoders.fromIssuerLocation(issuer);
}
@Bean
fun jwtDecoder(): JwtDecoders {
return JwtDecoders.fromIssuerLocation(issuer)
}
Configuring Trusted Algorithms
By default, NimbusJwtDecoder, and hence Resource Server, will only trust and verify tokens using RS256.
You can customize this via Spring Boot, the NimbusJwtDecoder builder, or from the JWK Set response.
Via Spring Boot
The simplest way to set the algorithm is as a property:
spring:
security:
oauth2:
resourceserver:
jwt:
jws-algorithms: RS512
jwk-set-uri: https://idp.example.org/.well-known/jwks.json
Using a Builder
For greater power, though, we can use a builder that ships with NimbusJwtDecoder:
-
Java
-
Kotlin
@Bean
JwtDecoder jwtDecoder() {
return NimbusJwtDecoder.withIssuerLocation(this.issuer)
.jwsAlgorithm(RS512).build();
}
@Bean
fun jwtDecoder(): JwtDecoder {
return NimbusJwtDecoder.withIssuerLocation(this.issuer)
.jwsAlgorithm(RS512).build()
}
Calling jwsAlgorithm more than once will configure NimbusJwtDecoder to trust more than one algorithm, like so:
-
Java
-
Kotlin
@Bean
JwtDecoder jwtDecoder() {
return NimbusJwtDecoder.withIssuerLocation(this.issuer)
.jwsAlgorithm(RS512).jwsAlgorithm(ES512).build();
}
@Bean
fun jwtDecoder(): JwtDecoder {
return NimbusJwtDecoder.withIssuerLocation(this.issuer)
.jwsAlgorithm(RS512).jwsAlgorithm(ES512).build()
}
Or, you can call jwsAlgorithms:
-
Java
-
Kotlin
@Bean
JwtDecoder jwtDecoder() {
return NimbusJwtDecoder.withIssuerLocation(this.issuer)
.jwsAlgorithms(algorithms -> {
algorithms.add(RS512);
algorithms.add(ES512);
}).build();
}
@Bean
fun jwtDecoder(): JwtDecoder {
return NimbusJwtDecoder.withIssuerLocation(this.issuer)
.jwsAlgorithms {
it.add(RS512)
it.add(ES512)
}.build()
}
From JWK Set response
Since Spring Security’s JWT support is based off of Nimbus, you can use all it’s great features as well.
For example, Nimbus has a JWSKeySelector implementation that will select the set of algorithms based on the JWK Set URI response.
You can use it to generate a NimbusJwtDecoder like so:
-
Java
-
Kotlin
@Bean
public JwtDecoder jwtDecoder() {
// makes a request to the JWK Set endpoint
JWSKeySelector<SecurityContext> jwsKeySelector =
JWSAlgorithmFamilyJWSKeySelector.fromJWKSetURL(this.jwkSetUrl);
DefaultJWTProcessor<SecurityContext> jwtProcessor =
new DefaultJWTProcessor<>();
jwtProcessor.setJWSKeySelector(jwsKeySelector);
return new NimbusJwtDecoder(jwtProcessor);
}
@Bean
fun jwtDecoder(): JwtDecoder {
// makes a request to the JWK Set endpoint
val jwsKeySelector: JWSKeySelector<SecurityContext> = JWSAlgorithmFamilyJWSKeySelector.fromJWKSetURL<SecurityContext>(this.jwkSetUrl)
val jwtProcessor: DefaultJWTProcessor<SecurityContext> = DefaultJWTProcessor()
jwtProcessor.jwsKeySelector = jwsKeySelector
return NimbusJwtDecoder(jwtProcessor)
}
Trusting a Single Asymmetric Key
Simpler than backing a Resource Server with a JWK Set endpoint is to hard-code an RSA public key.
The public key can be provided via Spring Boot or by Using a Builder.
Via Spring Boot
Specifying a key via Spring Boot is quite simple.
The key’s location can be specified like so:
spring:
security:
oauth2:
resourceserver:
jwt:
public-key-location: classpath:my-key.pub
Or, to allow for a more sophisticated lookup, you can post-process the RsaKeyConversionServicePostProcessor:
-
Java
-
Kotlin
@Bean
BeanFactoryPostProcessor conversionServiceCustomizer() {
return beanFactory ->
beanFactory.getBean(RsaKeyConversionServicePostProcessor.class)
.setResourceLoader(new CustomResourceLoader());
}
@Bean
fun conversionServiceCustomizer(): BeanFactoryPostProcessor {
return BeanFactoryPostProcessor { beanFactory ->
beanFactory.getBean<RsaKeyConversionServicePostProcessor>()
.setResourceLoader(CustomResourceLoader())
}
}
Specify your key’s location:
key.location: hfds://my-key.pub
And then autowire the value:
-
Java
-
Kotlin
@Value("${key.location}")
RSAPublicKey key;
@Value("\${key.location}")
val key: RSAPublicKey? = null
Using a Builder
To wire an RSAPublicKey directly, you can simply use the appropriate NimbusJwtDecoder builder, like so:
-
Java
-
Kotlin
@Bean
public JwtDecoder jwtDecoder() {
return NimbusJwtDecoder.withPublicKey(this.key).build();
}
@Bean
fun jwtDecoder(): JwtDecoder {
return NimbusJwtDecoder.withPublicKey(this.key).build()
}
Trusting a Single Symmetric Key
Using a single symmetric key is also simple.
You can simply load in your SecretKey and use the appropriate NimbusJwtDecoder builder, like so:
-
Java
-
Kotlin
@Bean
public JwtDecoder jwtDecoder() {
return NimbusJwtDecoder.withSecretKey(this.key).build();
}
@Bean
fun jwtDecoder(): JwtDecoder {
return NimbusJwtDecoder.withSecretKey(key).build()
}
Configuring Authorization
A JWT that is issued from an OAuth 2.0 Authorization Server will typically either have a scope or scp attribute, indicating the scopes (or authorities) it’s been granted, for example:
{ …, "scope" : "messages contacts"}
When this is the case, Resource Server will attempt to coerce these scopes into a list of granted authorities, prefixing each scope with the string "SCOPE_".
This means that to protect an endpoint or method with a scope derived from a JWT, the corresponding expressions should include this prefix:
Authorization Configuration
-
Java
-
Kotlin
-
Xml
import static org.springframework.security.oauth2.core.authorization.OAuth2AuthorizationManagers.hasScope;
@Configuration
@EnableWebSecurity
public class DirectlyConfiguredJwkSetUri {
@Bean
public SecurityFilterChain filterChain(HttpSecurity http) throws Exception {
http
.authorizeHttpRequests(authorize -> authorize
.requestMatchers("/contacts/**").access(hasScope("contacts"))
.requestMatchers("/messages/**").access(hasScope("messages"))
.anyRequest().authenticated()
)
.oauth2ResourceServer(OAuth2ResourceServerConfigurer::jwt);
return http.build();
}
}
import org.springframework.security.oauth2.core.authorization.OAuth2AuthorizationManagers.hasScope;
@Configuration
@EnableWebSecurity
class DirectlyConfiguredJwkSetUri {
@Bean
open fun filterChain(http: HttpSecurity): SecurityFilterChain {
http {
authorizeRequests {
authorize("/contacts/**", hasScope("contacts"))
authorize("/messages/**", hasScope("messages"))
authorize(anyRequest, authenticated)
}
oauth2ResourceServer {
jwt { }
}
}
return http.build()
}
}
<http>
<intercept-uri pattern="/contacts/**" access="hasAuthority('SCOPE_contacts')"/>
<intercept-uri pattern="/messages/**" access="hasAuthority('SCOPE_messages')"/>
<oauth2-resource-server>
<jwt jwk-set-uri="https://idp.example.org/.well-known/jwks.json"/>
</oauth2-resource-server>
</http>
Or similarly with method security:
-
Java
-
Kotlin
@PreAuthorize("hasAuthority('SCOPE_messages')")
public List<Message> getMessages(...) {}
@PreAuthorize("hasAuthority('SCOPE_messages')")
fun getMessages(): List<Message> { }
Extracting Authorities Manually
However, there are a number of circumstances where this default is insufficient.
For example, some authorization servers don’t use the scope attribute, but instead have their own custom attribute.
Or, at other times, the resource server may need to adapt the attribute or a composition of attributes into internalized authorities.
To this end, Spring Security ships with JwtAuthenticationConverter, which is responsible for converting a Jwt into an Authentication.
By default, Spring Security will wire the JwtAuthenticationProvider with a default instance of JwtAuthenticationConverter.
As part of configuring a JwtAuthenticationConverter, you can supply a subsidiary converter to go from Jwt to a Collection of granted authorities.
Let’s say that that your authorization server communicates authorities in a custom claim called authorities.
In that case, you can configure the claim that JwtAuthenticationConverter should inspect, like so:
Authorities Claim Configuration
-
Java
-
Kotlin
-
Xml
@Bean
public JwtAuthenticationConverter jwtAuthenticationConverter() {
JwtGrantedAuthoritiesConverter grantedAuthoritiesConverter = new JwtGrantedAuthoritiesConverter();
grantedAuthoritiesConverter.setAuthoritiesClaimName("authorities");
JwtAuthenticationConverter jwtAuthenticationConverter = new JwtAuthenticationConverter();
jwtAuthenticationConverter.setJwtGrantedAuthoritiesConverter(grantedAuthoritiesConverter);
return jwtAuthenticationConverter;
}
@Bean
fun jwtAuthenticationConverter(): JwtAuthenticationConverter {
val grantedAuthoritiesConverter = JwtGrantedAuthoritiesConverter()
grantedAuthoritiesConverter.setAuthoritiesClaimName("authorities")
val jwtAuthenticationConverter = JwtAuthenticationConverter()
jwtAuthenticationConverter.setJwtGrantedAuthoritiesConverter(grantedAuthoritiesConverter)
return jwtAuthenticationConverter
}
<http>
<intercept-uri pattern="/contacts/**" access="hasAuthority('SCOPE_contacts')"/>
<intercept-uri pattern="/messages/**" access="hasAuthority('SCOPE_messages')"/>
<oauth2-resource-server>
<jwt jwk-set-uri="https://idp.example.org/.well-known/jwks.json"
jwt-authentication-converter-ref="jwtAuthenticationConverter"/>
</oauth2-resource-server>
</http>
<bean id="jwtAuthenticationConverter"
class="org.springframework.security.oauth2.server.resource.authentication.JwtAuthenticationConverter">
<property name="jwtGrantedAuthoritiesConverter" ref="jwtGrantedAuthoritiesConverter"/>
</bean>
<bean id="jwtGrantedAuthoritiesConverter"
class="org.springframework.security.oauth2.server.resource.authentication.JwtGrantedAuthoritiesConverter">
<property name="authoritiesClaimName" value="authorities"/>
</bean>
You can also configure the authority prefix to be different as well.
Instead of prefixing each authority with SCOPE_, you can change it to ROLE_ like so:
Authorities Prefix Configuration
-
Java
-
Kotlin
-
Xml
@Bean
public JwtAuthenticationConverter jwtAuthenticationConverter() {
JwtGrantedAuthoritiesConverter grantedAuthoritiesConverter = new JwtGrantedAuthoritiesConverter();
grantedAuthoritiesConverter.setAuthorityPrefix("ROLE_");
JwtAuthenticationConverter jwtAuthenticationConverter = new JwtAuthenticationConverter();
jwtAuthenticationConverter.setJwtGrantedAuthoritiesConverter(grantedAuthoritiesConverter);
return jwtAuthenticationConverter;
}
@Bean
fun jwtAuthenticationConverter(): JwtAuthenticationConverter {
val grantedAuthoritiesConverter = JwtGrantedAuthoritiesConverter()
grantedAuthoritiesConverter.setAuthorityPrefix("ROLE_")
val jwtAuthenticationConverter = JwtAuthenticationConverter()
jwtAuthenticationConverter.setJwtGrantedAuthoritiesConverter(grantedAuthoritiesConverter)
return jwtAuthenticationConverter
}
<http>
<intercept-uri pattern="/contacts/**" access="hasAuthority('SCOPE_contacts')"/>
<intercept-uri pattern="/messages/**" access="hasAuthority('SCOPE_messages')"/>
<oauth2-resource-server>
<jwt jwk-set-uri="https://idp.example.org/.well-known/jwks.json"
jwt-authentication-converter-ref="jwtAuthenticationConverter"/>
</oauth2-resource-server>
</http>
<bean id="jwtAuthenticationConverter"
class="org.springframework.security.oauth2.server.resource.authentication.JwtAuthenticationConverter">
<property name="jwtGrantedAuthoritiesConverter" ref="jwtGrantedAuthoritiesConverter"/>
</bean>
<bean id="jwtGrantedAuthoritiesConverter"
class="org.springframework.security.oauth2.server.resource.authentication.JwtGrantedAuthoritiesConverter">
<property name="authorityPrefix" value="ROLE_"/>
</bean>
Or, you can remove the prefix altogether by calling JwtGrantedAuthoritiesConverter#setAuthorityPrefix("").
For more flexibility, the DSL supports entirely replacing the converter with any class that implements Converter<Jwt, AbstractAuthenticationToken>:
-
Java
-
Kotlin
static class CustomAuthenticationConverter implements Converter<Jwt, AbstractAuthenticationToken> {
public AbstractAuthenticationToken convert(Jwt jwt) {
return new CustomAuthenticationToken(jwt);
}
}
// ...
@Configuration
@EnableWebSecurity
public class CustomAuthenticationConverterConfig {
@Bean
public SecurityFilterChain filterChain(HttpSecurity http) throws Exception {
http
.authorizeHttpRequests(authorize -> authorize
.anyRequest().authenticated()
)
.oauth2ResourceServer(oauth2 -> oauth2
.jwt(jwt -> jwt
.jwtAuthenticationConverter(new CustomAuthenticationConverter())
)
);
return http.build();
}
}
internal class CustomAuthenticationConverter : Converter<Jwt, AbstractAuthenticationToken> {
override fun convert(jwt: Jwt): AbstractAuthenticationToken {
return CustomAuthenticationToken(jwt)
}
}
// ...
@Configuration
@EnableWebSecurity
class CustomAuthenticationConverterConfig {
@Bean
open fun filterChain(http: HttpSecurity): SecurityFilterChain {
http {
authorizeRequests {
authorize(anyRequest, authenticated)
}
oauth2ResourceServer {
jwt {
jwtAuthenticationConverter = CustomAuthenticationConverter()
}
}
}
return http.build()
}
}
Configuring Validation
Using minimal Spring Boot configuration, indicating the authorization server’s issuer uri, Resource Server will default to verifying the iss claim as well as the exp and nbf timestamp claims.
In circumstances where validation needs to be customized, Resource Server ships with two standard validators and also accepts custom OAuth2TokenValidator instances.
Customizing Timestamp Validation
JWT’s typically have a window of validity, with the start of the window indicated in the nbf claim and the end indicated in the exp claim.
However, every server can experience clock drift, which can cause tokens to appear expired to one server, but not to another.
This can cause some implementation heartburn as the number of collaborating servers increases in a distributed system.
Resource Server uses JwtTimestampValidator to verify a token’s validity window, and it can be configured with a clockSkew to alleviate the above problem:
-
Java
-
Kotlin
@Bean
JwtDecoder jwtDecoder() {
NimbusJwtDecoder jwtDecoder = (NimbusJwtDecoder)
JwtDecoders.fromIssuerLocation(issuerUri);
OAuth2TokenValidator<Jwt> withClockSkew = new DelegatingOAuth2TokenValidator<>(
new JwtTimestampValidator(Duration.ofSeconds(60)),
new JwtIssuerValidator(issuerUri));
jwtDecoder.setJwtValidator(withClockSkew);
return jwtDecoder;
}
@Bean
fun jwtDecoder(): JwtDecoder {
val jwtDecoder: NimbusJwtDecoder = JwtDecoders.fromIssuerLocation(issuerUri) as NimbusJwtDecoder
val withClockSkew: OAuth2TokenValidator<Jwt> = DelegatingOAuth2TokenValidator(
JwtTimestampValidator(Duration.ofSeconds(60)),
JwtIssuerValidator(issuerUri))
jwtDecoder.setJwtValidator(withClockSkew)
return jwtDecoder
}
By default, Resource Server configures a clock skew of 60 seconds.
Configuring a Custom Validator
Adding a check for the aud claim is simple with the OAuth2TokenValidator API:
-
Java
-
Kotlin
OAuth2TokenValidator<Jwt> audienceValidator() {
return new JwtClaimValidator<List<String>>(AUD, aud -> aud.contains("messaging"));
}
fun audienceValidator(): OAuth2TokenValidator<Jwt?> {
return JwtClaimValidator<List<String>>(AUD) { aud -> aud.contains("messaging") }
}
Or, for more control you can implement your own OAuth2TokenValidator:
-
Java
-
Kotlin
static class AudienceValidator implements OAuth2TokenValidator<Jwt> {
OAuth2Error error = new OAuth2Error("custom_code", "Custom error message", null);
@Override
public OAuth2TokenValidatorResult validate(Jwt jwt) {
if (jwt.getAudience().contains("messaging")) {
return OAuth2TokenValidatorResult.success();
} else {
return OAuth2TokenValidatorResult.failure(error);
}
}
}
// ...
OAuth2TokenValidator<Jwt> audienceValidator() {
return new AudienceValidator();
}
internal class AudienceValidator : OAuth2TokenValidator<Jwt> {
var error: OAuth2Error = OAuth2Error("custom_code", "Custom error message", null)
override fun validate(jwt: Jwt): OAuth2TokenValidatorResult {
return if (jwt.audience.contains("messaging")) {
OAuth2TokenValidatorResult.success()
} else {
OAuth2TokenValidatorResult.failure(error)
}
}
}
// ...
fun audienceValidator(): OAuth2TokenValidator<Jwt> {
return AudienceValidator()
}
Then, to add into a resource server, it’s a matter of specifying the JwtDecoder instance:
-
Java
-
Kotlin
@Bean
JwtDecoder jwtDecoder() {
NimbusJwtDecoder jwtDecoder = (NimbusJwtDecoder)
JwtDecoders.fromIssuerLocation(issuerUri);
OAuth2TokenValidator<Jwt> audienceValidator = audienceValidator();
OAuth2TokenValidator<Jwt> withIssuer = JwtValidators.createDefaultWithIssuer(issuerUri);
OAuth2TokenValidator<Jwt> withAudience = new DelegatingOAuth2TokenValidator<>(withIssuer, audienceValidator);
jwtDecoder.setJwtValidator(withAudience);
return jwtDecoder;
}
@Bean
fun jwtDecoder(): JwtDecoder {
val jwtDecoder: NimbusJwtDecoder = JwtDecoders.fromIssuerLocation(issuerUri) as NimbusJwtDecoder
val audienceValidator = audienceValidator()
val withIssuer: OAuth2TokenValidator<Jwt> = JwtValidators.createDefaultWithIssuer(issuerUri)
val withAudience: OAuth2TokenValidator<Jwt> = DelegatingOAuth2TokenValidator(withIssuer, audienceValidator)
jwtDecoder.setJwtValidator(withAudience)
return jwtDecoder
}
As stated earlier, you can instead configure aud validation in Boot.
Configuring Claim Set Mapping
Spring Security uses the Nimbus library for parsing JWTs and validating their signatures.
Consequently, Spring Security is subject to Nimbus’s interpretation of each field value and how to coerce each into a Java type.
For example, because Nimbus remains Java 7 compatible, it doesn’t use Instant to represent timestamp fields.
And it’s entirely possible to use a different library or for JWT processing, which may make its own coercion decisions that need adjustment.
Or, quite simply, a resource server may want to add or remove claims from a JWT for domain-specific reasons.
For these purposes, Resource Server supports mapping the JWT claim set with MappedJwtClaimSetConverter.
Customizing the Conversion of a Single Claim
By default, MappedJwtClaimSetConverter will attempt to coerce claims into the following types:
Claim
Java Type
aud
Collection<String>
exp
Instant
iat
Instant
iss
String
jti
String
nbf
Instant
sub
String
An individual claim’s conversion strategy can be configured using MappedJwtClaimSetConverter.withDefaults:
-
Java
-
Kotlin
@Bean
JwtDecoder jwtDecoder() {
NimbusJwtDecoder jwtDecoder = NimbusJwtDecoder.withIssuerLocation(issuer).build();
MappedJwtClaimSetConverter converter = MappedJwtClaimSetConverter
.withDefaults(Collections.singletonMap("sub", this::lookupUserIdBySub));
jwtDecoder.setClaimSetConverter(converter);
return jwtDecoder;
}
@Bean
fun jwtDecoder(): JwtDecoder {
val jwtDecoder = NimbusJwtDecoder.withIssuerLocation(issuer).build()
val converter = MappedJwtClaimSetConverter
.withDefaults(mapOf("sub" to this::lookupUserIdBySub))
jwtDecoder.setClaimSetConverter(converter)
return jwtDecoder
}
This will keep all the defaults, except it will override the default claim converter for sub.
Adding a Claim
MappedJwtClaimSetConverter can also be used to add a custom claim, for example, to adapt to an existing system:
-
Java
-
Kotlin
MappedJwtClaimSetConverter.withDefaults(Collections.singletonMap("custom", custom -> "value"));
MappedJwtClaimSetConverter.withDefaults(mapOf("custom" to Converter<Any, String> { "value" }))
Removing a Claim
And removing a claim is also simple, using the same API:
-
Java
-
Kotlin
MappedJwtClaimSetConverter.withDefaults(Collections.singletonMap("legacyclaim", legacy -> null));
MappedJwtClaimSetConverter.withDefaults(mapOf("legacyclaim" to Converter<Any, Any> { null }))
Renaming a Claim
In more sophisticated scenarios, like consulting multiple claims at once or renaming a claim, Resource Server accepts any class that implements Converter<Map<String, Object>, Map<String,Object>>:
-
Java
-
Kotlin
public class UsernameSubClaimAdapter implements Converter<Map<String, Object>, Map<String, Object>> {
private final MappedJwtClaimSetConverter delegate =
MappedJwtClaimSetConverter.withDefaults(Collections.emptyMap());
public Map<String, Object> convert(Map<String, Object> claims) {
Map<String, Object> convertedClaims = this.delegate.convert(claims);
String username = (String) convertedClaims.get("user_name");
convertedClaims.put("sub", username);
return convertedClaims;
}
}
class UsernameSubClaimAdapter : Converter<Map<String, Any?>, Map<String, Any?>> {
private val delegate = MappedJwtClaimSetConverter.withDefaults(Collections.emptyMap())
override fun convert(claims: Map<String, Any?>): Map<String, Any?> {
val convertedClaims = delegate.convert(claims)
val username = convertedClaims["user_name"] as String
convertedClaims["sub"] = username
return convertedClaims
}
}
And then, the instance can be supplied like normal:
-
Java
-
Kotlin
@Bean
JwtDecoder jwtDecoder() {
NimbusJwtDecoder jwtDecoder = NimbusJwtDecoder.withIssuerLocation(issuer).build();
jwtDecoder.setClaimSetConverter(new UsernameSubClaimAdapter());
return jwtDecoder;
}
@Bean
fun jwtDecoder(): JwtDecoder {
val jwtDecoder: NimbusJwtDecoder = NimbusJwtDecoder.withIssuerLocation(issuer).build()
jwtDecoder.setClaimSetConverter(UsernameSubClaimAdapter())
return jwtDecoder
}
Configuring Timeouts
By default, Resource Server uses connection and socket timeouts of 30 seconds each for coordinating with the authorization server.
This may be too short in some scenarios.
Further, it doesn’t take into account more sophisticated patterns like back-off and discovery.
To adjust the way in which Resource Server connects to the authorization server, NimbusJwtDecoder accepts an instance of RestOperations:
-
Java
-
Kotlin
@Bean
public JwtDecoder jwtDecoder(RestTemplateBuilder builder) {
RestOperations rest = builder
.setConnectTimeout(Duration.ofSeconds(60))
.setReadTimeout(Duration.ofSeconds(60))
.build();
NimbusJwtDecoder jwtDecoder = NimbusJwtDecoder.withIssuerLocation(issuer).restOperations(rest).build();
return jwtDecoder;
}
@Bean
fun jwtDecoder(builder: RestTemplateBuilder): JwtDecoder {
val rest: RestOperations = builder
.setConnectTimeout(Duration.ofSeconds(60))
.setReadTimeout(Duration.ofSeconds(60))
.build()
return NimbusJwtDecoder.withIssuerLocation(issuer).restOperations(rest).build()
}
Also by default, Resource Server caches in-memory the authorization server’s JWK set for 5 minutes, which you may want to adjust.
Further, it doesn’t take into account more sophisticated caching patterns like eviction or using a shared cache.
To adjust the way in which Resource Server caches the JWK set, NimbusJwtDecoder accepts an instance of Cache:
-
Java
-
Kotlin
@Bean
public JwtDecoder jwtDecoder(CacheManager cacheManager) {
return NimbusJwtDecoder.withIssuerLocation(issuer)
.cache(cacheManager.getCache("jwks"))
.build();
}
@Bean
fun jwtDecoder(cacheManager: CacheManager): JwtDecoder {
return NimbusJwtDecoder.withIssuerLocation(issuer)
.cache(cacheManager.getCache("jwks"))
.build()
}
When given a Cache, Resource Server will use the JWK Set Uri as the key and the JWK Set JSON as the value.
Spring isn’t a cache provider, so you’ll need to make sure to include the appropriate dependencies, like spring-boot-starter-cache and your favorite caching provider.
Whether it’s socket or cache timeouts, you may instead want to work with Nimbus directly.
To do so, remember that NimbusJwtDecoder ships with a constructor that takes Nimbus’s JWTProcessor.