子元素
当此Gateway正在接收来自 的消息PollableChannel,您必须提供
全局默认值Poller或提供Poller子元素添加到Job Launching Gateway.
-
Java
-
XML
下面的示例展示了如何在 Java 中提供 Poller:
@Bean
@ServiceActivator(inputChannel = "queueChannel", poller = @Poller(fixedRate="1000"))
public JobLaunchingGateway sampleJobLaunchingGateway() {
    JobLaunchingGateway jobLaunchingGateway = new JobLaunchingGateway(jobLauncher());
    jobLaunchingGateway.setOutputChannel(replyChannel());
    return jobLaunchingGateway;
}
下面的示例展示了如何在 XML 中提供 Poller:
<batch-int:job-launching-gateway request-channel="queueChannel"
    reply-channel="replyChannel" job-launcher="jobLauncher">
  <int:poller fixed-rate="1000">
</batch-int:job-launching-gateway>
通过信息性消息提供反馈
由于 Spring Batch 作业可以长时间运行,因此提供进度 信息通常至关重要。例如,利益相关者可能希望 以在批处理作业的部分或全部部分失败时收到通知。 Spring Batch 为正在收集的此信息提供支持 通过:
-
主动轮询
-
事件驱动的侦听器
异步启动 Spring Batch 作业时(例如,通过使用作业启动
Gateway)、JobExecutioninstance 返回。因此,您可以使用JobExecution.getJobId()通过检索JobExecution从JobRepository通过使用JobExplorer.然而,这是
被视为次优,首选事件驱动方法。
因此,Spring Batch 提供了侦听器,包括最常用的三种 听众:
-
StepListener -
ChunkListener -
JobExecutionListener
在下图所示的示例中,Spring Batch 作业配置了StepExecutionListener.因此,Spring Integration 接收并处理之前的任何步骤
或事件发生后。例如,您可以检查收到的StepExecution通过使用Router.根据该检查的结果,可能会发生各种情况(例如
将邮件路由到邮件出站通道适配器),以便电子邮件通知可以
根据某些条件发出。
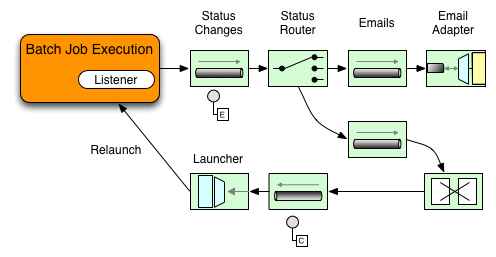
以下由两部分组成的示例显示了如何配置侦听器以发送
message 发送到Gateway对于StepExecution事件并将其输出记录到logging-channel-adapter.
首先,创建通知集成 Bean。
-
Java
-
XML
以下示例显示了如何在 Java 中创建通知集成 Bean:
@Bean
@ServiceActivator(inputChannel = "stepExecutionsChannel")
public LoggingHandler loggingHandler() {
    LoggingHandler adapter = new LoggingHandler(LoggingHandler.Level.WARN);
    adapter.setLoggerName("TEST_LOGGER");
    adapter.setLogExpressionString("headers.id + ': ' + payload");
    return adapter;
}

@MessagingGateway(name = "notificationExecutionsListener", defaultRequestChannel = "stepExecutionsChannel")
public interface NotificationExecutionListener extends StepExecutionListener {}您需要添加@IntegrationComponentScan注释添加到您的配置中。 |
以下示例显示了如何在 XML 中创建通知集成 Bean:
<int:channel id="stepExecutionsChannel"/>

<int:gateway id="notificationExecutionsListener"
    service-interface="org.springframework.batch.core.StepExecutionListener"
    default-request-channel="stepExecutionsChannel"/>

<int:logging-channel-adapter channel="stepExecutionsChannel"/>
其次,修改您的作业以添加步骤级侦听器。
-
Java
-
XML
以下示例显示了如何在 Java 中添加步骤级侦听器:
public Job importPaymentsJob(JobRepository jobRepository, PlatformTransactionManager transactionManager) {
    return new JobBuilder("importPayments", jobRepository)
        .start(new StepBuilder("step1", jobRepository)
                .chunk(200, transactionManager)
                .listener(notificationExecutionsListener())
                // ...
                .build();
              )
        .build();
}
以下示例演示如何在 XML 中添加步骤级侦听器:
<job id="importPayments">
    <step id="step1">
        <tasklet ../>
            <chunk ../>
            <listeners>
                <listener ref="notificationExecutionsListener"/>
            </listeners>
        </tasklet>
        ...
    </step>
</job>
异步处理器
异步处理器可帮助您扩展项目的处理。在异步
处理器用例、AsyncItemProcessor作为调度程序,执行
这ItemProcessor对于新线程上的项。项目完成后,Future是
传递给AsyncItemWriter被写入。
因此,基本上,您可以通过使用异步项目处理来提高性能
允许您实现 fork-join 方案。这AsyncItemWriter收集结果,然后
一旦所有结果都可用,就会写回 chunk。
-
Java
-
XML
以下示例显示如何配置AsyncItemProcessor在 Java 中:
@Bean
public AsyncItemProcessor processor(ItemProcessor itemProcessor, TaskExecutor taskExecutor) {
    AsyncItemProcessor asyncItemProcessor = new AsyncItemProcessor();
    asyncItemProcessor.setTaskExecutor(taskExecutor);
    asyncItemProcessor.setDelegate(itemProcessor);
    return asyncItemProcessor;
}以下示例显示如何配置AsyncItemProcessor在 XML 中:
<bean id="processor"
    class="org.springframework.batch.integration.async.AsyncItemProcessor">
  <property name="delegate">
    <bean class="your.ItemProcessor"/>
  </property>
  <property name="taskExecutor">
    <bean class="org.springframework.core.task.SimpleAsyncTaskExecutor"/>
  </property>
</bean>这delegateproperty 引用您的ItemProcessorbean 和taskExecutorproperty 引用TaskExecutor由您选择。
-
Java
-
XML
以下示例显示如何配置AsyncItemWriter在 Java 中:
@Bean
public AsyncItemWriter writer(ItemWriter itemWriter) {
    AsyncItemWriter asyncItemWriter = new AsyncItemWriter();
    asyncItemWriter.setDelegate(itemWriter);
    return asyncItemWriter;
}以下示例显示如何配置AsyncItemWriter在 XML 中:
<bean id="itemWriter"
    class="org.springframework.batch.integration.async.AsyncItemWriter">
  <property name="delegate">
    <bean id="itemWriter" class="your.ItemWriter"/>
  </property>
</bean>同样,delegateproperty 为
实际上是对ItemWriter豆。
外部化批处理执行
到目前为止讨论的集成方法建议了用例 其中 Spring Integration 将 Spring Batch 包装成一个外壳。 但是,Spring Batch 也可以在内部使用 Spring Integration。 通过使用这种方法, Spring Batch 用户可以委托 将项目甚至块处理到外部进程。这 用于卸载复杂的处理。Spring Batch 集成 为以下产品提供专门支持:
-
远程分块
-
远程分区
远程分块
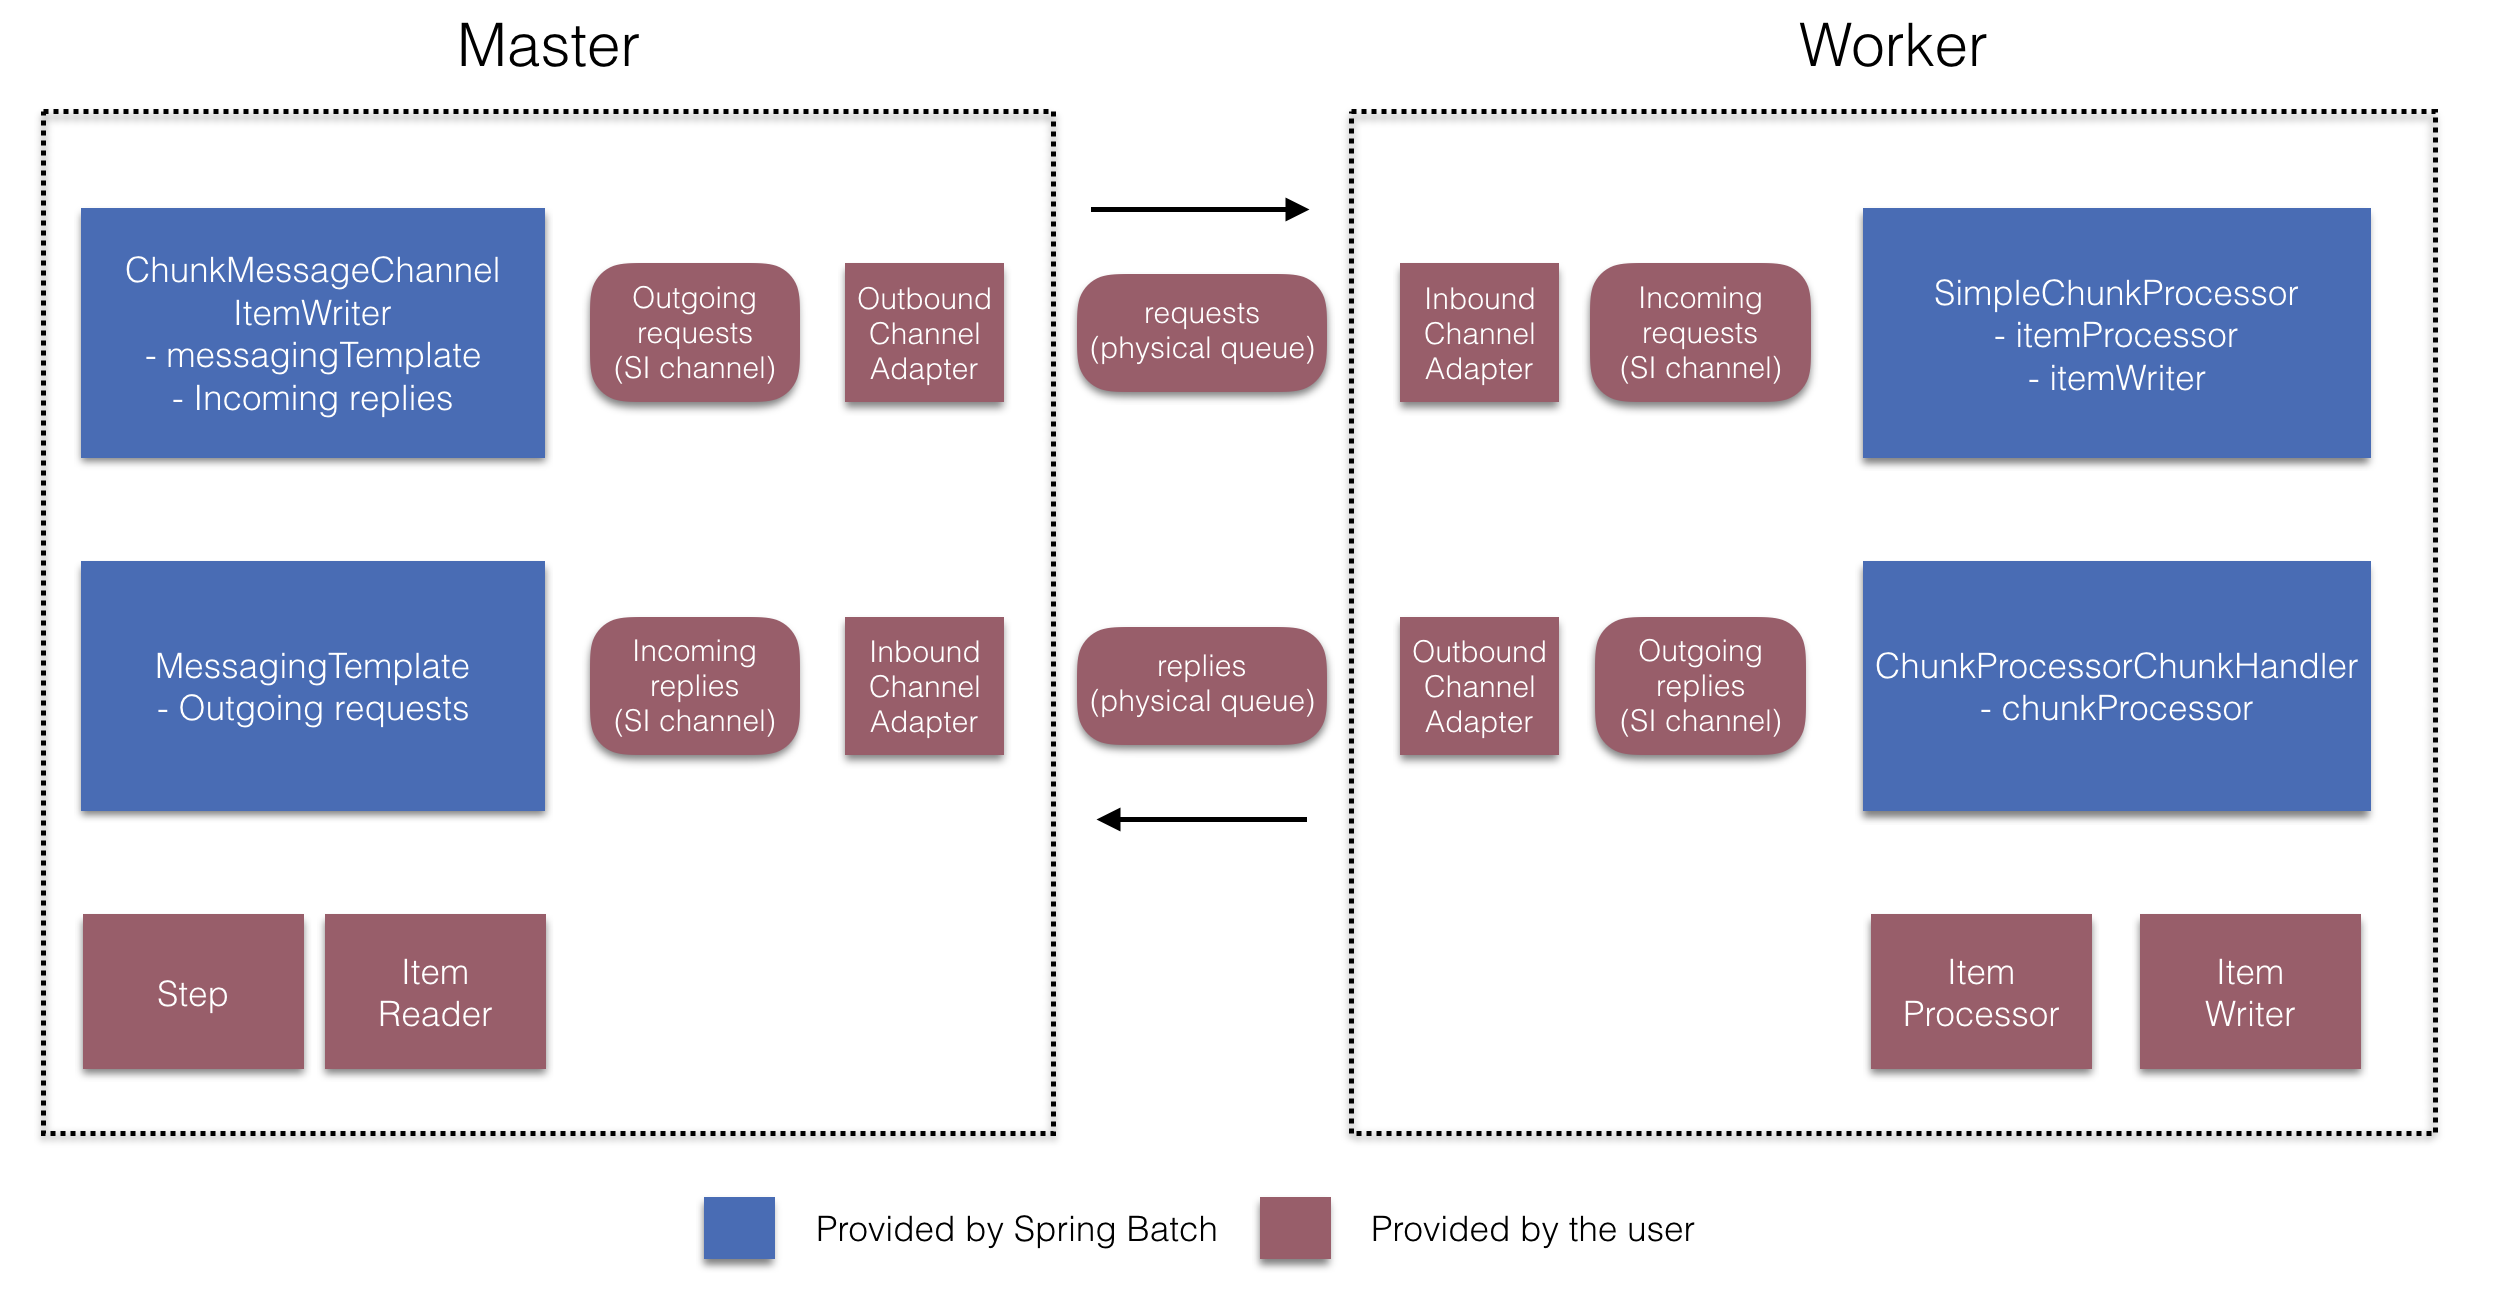
下图显示了使用 Spring Batch 时远程分块工作的一种方式 与 Spring 集成一起:
更进一步,您还可以将
chunk 处理ChunkMessageChannelItemWriter(由 Spring Batch Integration 提供),它发送项目
并收集结果。发送后, Spring Batch 会继续
读取和分组项目的过程,而无需等待结果。
相反,这是ChunkMessageChannelItemWriter收集结果并将其集成回 Spring Batch 进程中。
使用 Spring Integration,您可以获得完整的
控制进程的并发性(例如,通过
使用QueueChannel而不是DirectChannel).此外,通过依赖
Spring 集成丰富的通道适配器集合(例如
JMS 和 AMQP),您可以将批处理作业的块分发到
用于处理的外部系统。
-
Java
-
XML
具有要远程分块的步骤的作业可能具有类似于 在 Java 中遵循:
public Job chunkJob(JobRepository jobRepository, PlatformTransactionManager transactionManager) {
     return new JobBuilder("personJob", jobRepository)
             .start(new StepBuilder("step1", jobRepository)
                     .<Person, Person>chunk(200, transactionManager)
                     .reader(itemReader())
                     .writer(itemWriter())
                     .build())
             .build();
 }
具有要远程分块的步骤的作业可能具有类似于 following 的 XML 格式:
<job id="personJob">
  <step id="step1">
    <tasklet>
      <chunk reader="itemReader" writer="itemWriter" commit-interval="200"/>
    </tasklet>
    ...
  </step>
</job>这ItemReader引用指向要用于读取
经理。这ItemWriter特殊ItemWriter(称为ChunkMessageChannelItemWriter),如前所述。处理器(如果有)处于关闭状态
Manager 配置,因为它是在 worker 上配置的。您应该检查任何
其他组件属性,例如限制等,在实现
您的用例。
-
Java
-
XML
以下 Java 配置提供了基本的 manager 设置:
@Bean
public org.apache.activemq.ActiveMQConnectionFactory connectionFactory() {
    ActiveMQConnectionFactory factory = new ActiveMQConnectionFactory();
    factory.setBrokerURL("tcp://localhost:61616");
    return factory;
}

/*
 * Configure outbound flow (requests going to workers)
 */
@Bean
public DirectChannel requests() {
    return new DirectChannel();
}

@Bean
public IntegrationFlow outboundFlow(ActiveMQConnectionFactory connectionFactory) {
    return IntegrationFlow
            .from(requests())
            .handle(Jms.outboundAdapter(connectionFactory).destination("requests"))
            .get();
}

/*
 * Configure inbound flow (replies coming from workers)
 */
@Bean
public QueueChannel replies() {
    return new QueueChannel();
}

@Bean
public IntegrationFlow inboundFlow(ActiveMQConnectionFactory connectionFactory) {
    return IntegrationFlow
            .from(Jms.messageDrivenChannelAdapter(connectionFactory).destination("replies"))
            .channel(replies())
            .get();
}

/*
 * Configure the ChunkMessageChannelItemWriter
 */
@Bean
public ItemWriter<Integer> itemWriter() {
    MessagingTemplate messagingTemplate = new MessagingTemplate();
    messagingTemplate.setDefaultChannel(requests());
    messagingTemplate.setReceiveTimeout(2000);
    ChunkMessageChannelItemWriter<Integer> chunkMessageChannelItemWriter
            = new ChunkMessageChannelItemWriter<>();
    chunkMessageChannelItemWriter.setMessagingOperations(messagingTemplate);
    chunkMessageChannelItemWriter.setReplyChannel(replies());
    return chunkMessageChannelItemWriter;
}
以下 XML 配置提供了基本的 manager 设置:
<bean id="connectionFactory" class="org.apache.activemq.ActiveMQConnectionFactory">
  <property name="brokerURL" value="tcp://localhost:61616"/>
</bean>

<int-jms:outbound-channel-adapter id="jmsRequests" destination-name="requests"/>

<bean id="messagingTemplate"
    class="org.springframework.integration.core.MessagingTemplate">
  <property name="defaultChannel" ref="requests"/>
  <property name="receiveTimeout" value="2000"/>
</bean>

<bean id="itemWriter"
    class="org.springframework.batch.integration.chunk.ChunkMessageChannelItemWriter"
    scope="step">
  <property name="messagingOperations" ref="messagingTemplate"/>
  <property name="replyChannel" ref="replies"/>
</bean>

<int:channel id="replies">
  <int:queue/>
</int:channel>

<int-jms:message-driven-channel-adapter id="jmsReplies"
    destination-name="replies"
    channel="replies"/>
前面的配置为我们提供了许多 bean。我们
使用 ActiveMQ 配置我们的消息中间件,并将
Spring 集成提供的入站和出站 JMS 适配器。如
所示,则我们的itemWriterbean,即
引用我们的 Job 步骤,使用ChunkMessageChannelItemWriter要在
配置的中间件。
现在我们可以继续进行 worker 配置,如下例所示:
-
Java
-
XML
以下示例显示了 Java 中的 worker 配置:
@Bean
public org.apache.activemq.ActiveMQConnectionFactory connectionFactory() {
    ActiveMQConnectionFactory factory = new ActiveMQConnectionFactory();
    factory.setBrokerURL("tcp://localhost:61616");
    return factory;
}

/*
 * Configure inbound flow (requests coming from the manager)
 */
@Bean
public DirectChannel requests() {
    return new DirectChannel();
}

@Bean
public IntegrationFlow inboundFlow(ActiveMQConnectionFactory connectionFactory) {
    return IntegrationFlow
            .from(Jms.messageDrivenChannelAdapter(connectionFactory).destination("requests"))
            .channel(requests())
            .get();
}

/*
 * Configure outbound flow (replies going to the manager)
 */
@Bean
public DirectChannel replies() {
    return new DirectChannel();
}

@Bean
public IntegrationFlow outboundFlow(ActiveMQConnectionFactory connectionFactory) {
    return IntegrationFlow
            .from(replies())
            .handle(Jms.outboundAdapter(connectionFactory).destination("replies"))
            .get();
}

/*
 * Configure the ChunkProcessorChunkHandler
 */
@Bean
@ServiceActivator(inputChannel = "requests", outputChannel = "replies")
public ChunkProcessorChunkHandler<Integer> chunkProcessorChunkHandler() {
    ChunkProcessor<Integer> chunkProcessor
            = new SimpleChunkProcessor<>(itemProcessor(), itemWriter());
    ChunkProcessorChunkHandler<Integer> chunkProcessorChunkHandler
            = new ChunkProcessorChunkHandler<>();
    chunkProcessorChunkHandler.setChunkProcessor(chunkProcessor);
    return chunkProcessorChunkHandler;
}
以下示例显示了 XML 中的 worker 配置:
<bean id="connectionFactory" class="org.apache.activemq.ActiveMQConnectionFactory">
  <property name="brokerURL" value="tcp://localhost:61616"/>
</bean>

<int:channel id="requests"/>
<int:channel id="replies"/>

<int-jms:message-driven-channel-adapter id="incomingRequests"
    destination-name="requests"
    channel="requests"/>

<int-jms:outbound-channel-adapter id="outgoingReplies"
    destination-name="replies"
    channel="replies">
</int-jms:outbound-channel-adapter>

<int:service-activator id="serviceActivator"
    input-channel="requests"
    output-channel="replies"
    ref="chunkProcessorChunkHandler"
    method="handleChunk"/>

<bean id="chunkProcessorChunkHandler"
    class="org.springframework.batch.integration.chunk.ChunkProcessorChunkHandler">
  <property name="chunkProcessor">
    <bean class="org.springframework.batch.core.step.item.SimpleChunkProcessor">
      <property name="itemWriter">
        <bean class="io.spring.sbi.PersonItemWriter"/>
      </property>
      <property name="itemProcessor">
        <bean class="io.spring.sbi.PersonItemProcessor"/>
      </property>
    </bean>
  </property>
</bean>
这些配置项中的大多数从
Manager 配置。工作人员不需要访问
Spring BatchJobRepository也不
添加到实际的作业配置文件中。感兴趣的主要 bean
是chunkProcessorChunkHandler.这chunkProcessor的属性ChunkProcessorChunkHandler采用
配置SimpleChunkProcessor,这是您在此处提供对ItemWriter(以及可选的ItemProcessor),它将在 worker 上运行
当它从 Manager 接收 chunk 时。
有关更多信息,请参阅“可扩展性”一章中有关 Remote Chunking 的部分。
从版本 4.1 开始, Spring Batch Integration 引入了@EnableBatchIntegration可用于简化远程分块设置的注释。此注释提供
两个 bean 可以在应用程序上下文中自动装配:
-
RemoteChunkingManagerStepBuilderFactory:配置管理器步骤 -
RemoteChunkingWorkerBuilder:配置远程工作人员集成流程
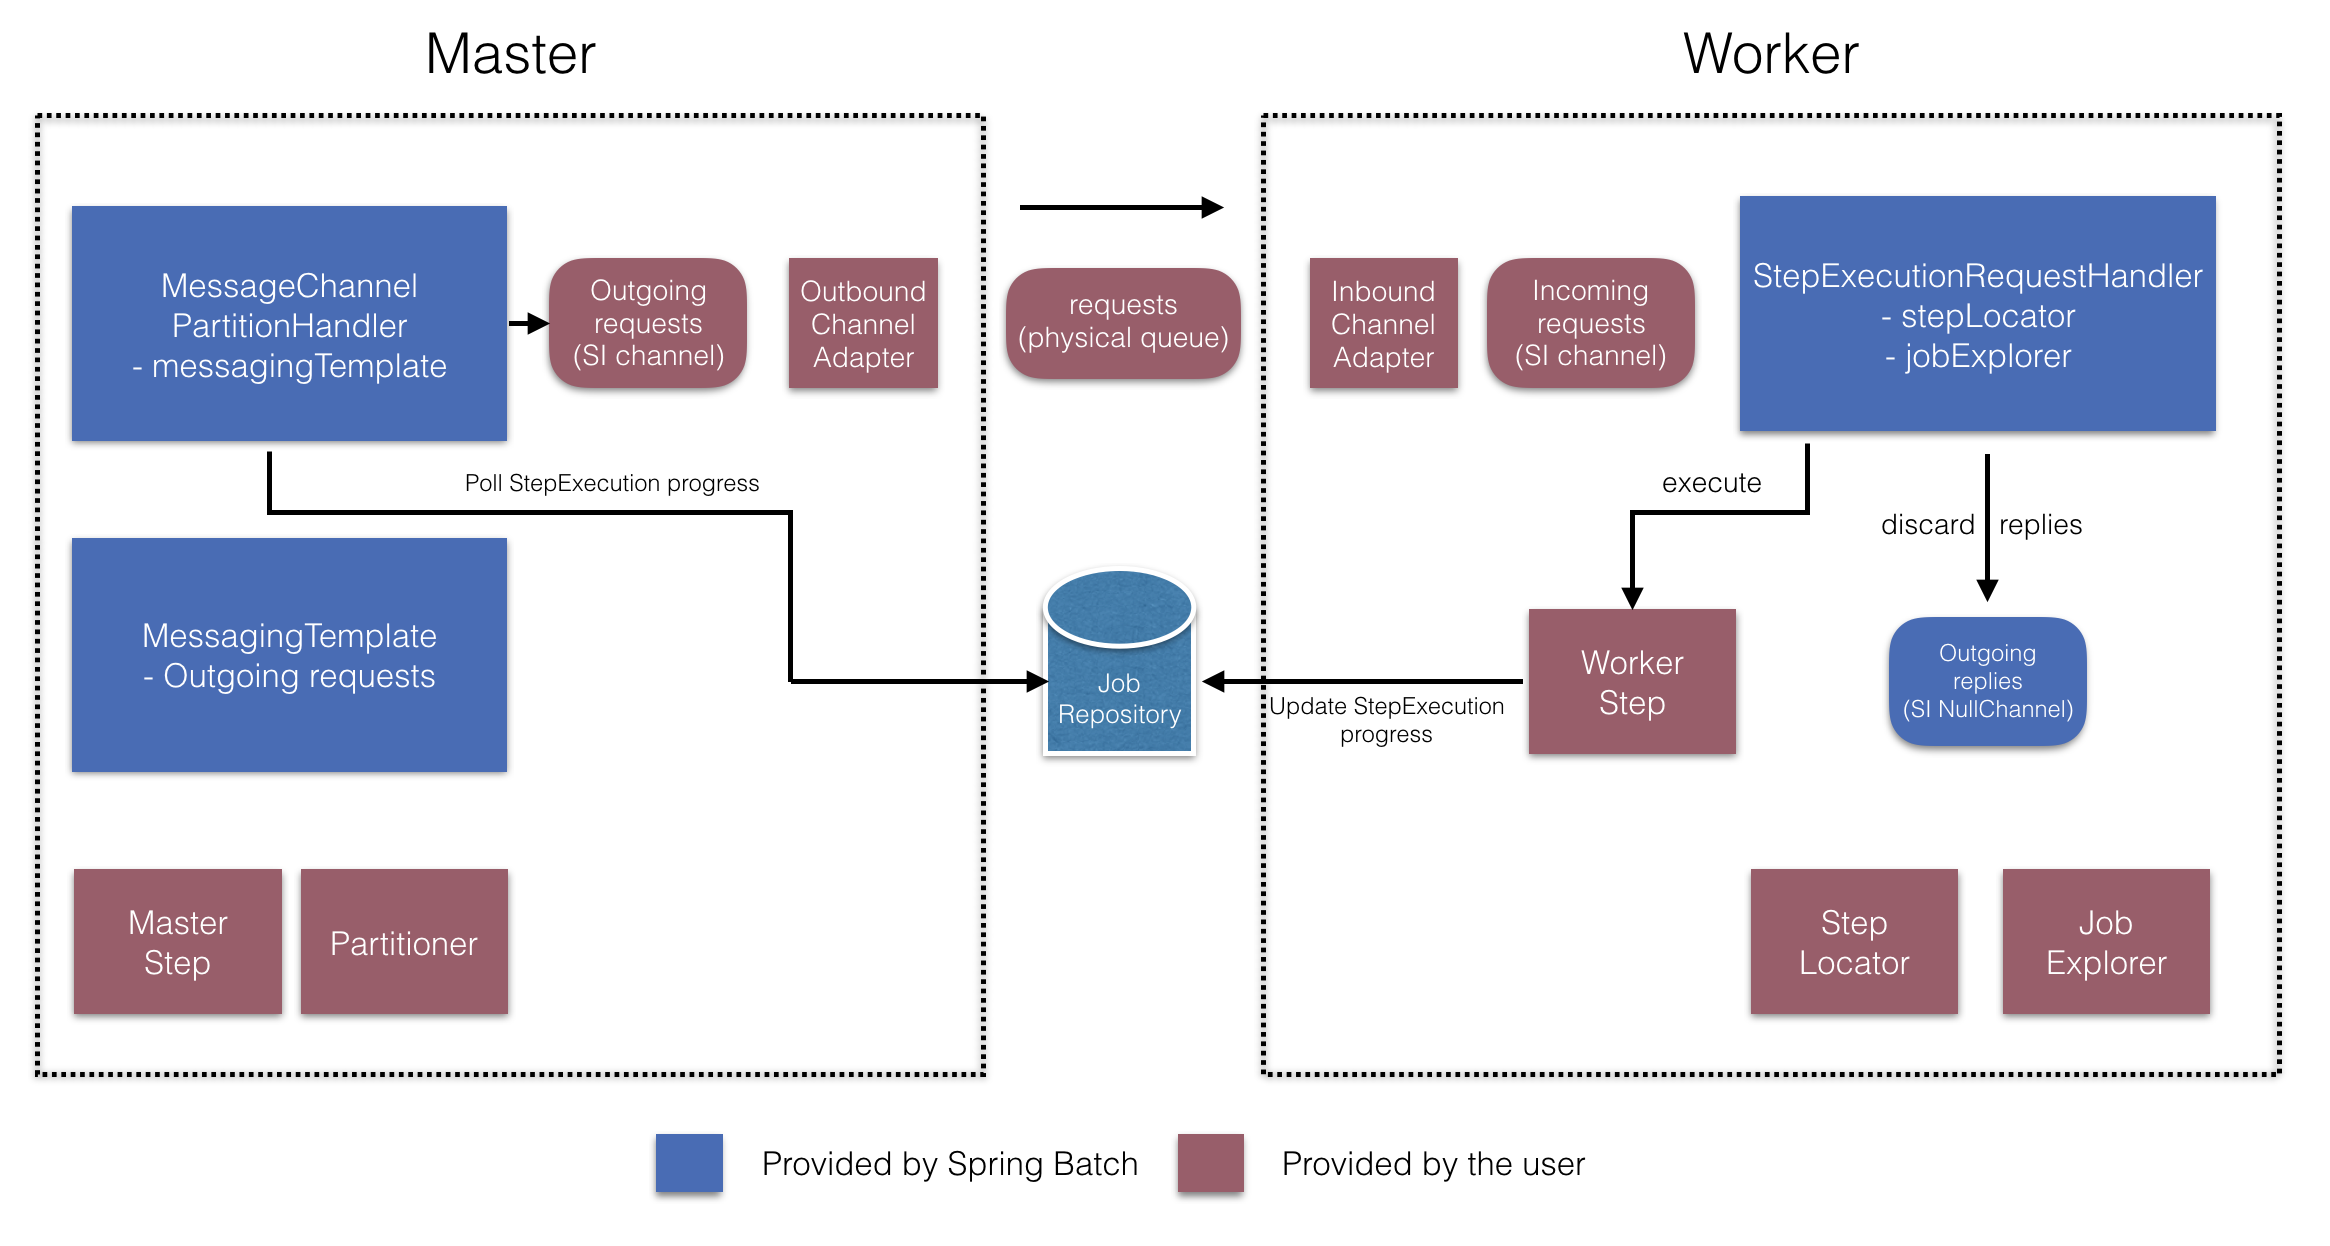
这些 API 负责配置许多组件,如下图所示:
在 Manager 端,RemoteChunkingManagerStepBuilderFactory让您
通过声明来配置 Manager 步骤:
-
用于读取项目并将其发送给工作人员的项目读取器
-
输出通道(“Outgoing requests”),用于向 worker 发送请求
-
用于接收来自 worker 的回复的输入通道(“Incoming replies”)
您无需显式配置ChunkMessageChannelItemWriter和MessagingTemplate.
(如果找到理由,您仍然可以显式配置它们)。
在 worker 端,RemoteChunkingWorkerBuilder允许您将 worker 配置为:
-
侦听 manager 在 input 通道上发送的请求(“Incoming requests”)
-
调用
handleChunkmethod 的ChunkProcessorChunkHandler对于每个请求 使用配置的ItemProcessor和ItemWriter -
将输出通道上的回复(“传出回复”)发送到管理器
您无需显式配置SimpleChunkProcessor和ChunkProcessorChunkHandler.(如果您发现
这样做的理由)。
以下示例演示如何使用这些 API:
@EnableBatchIntegration
@EnableBatchProcessing
public class RemoteChunkingJobConfiguration {

    @Configuration
    public static class ManagerConfiguration {

        @Autowired
        private RemoteChunkingManagerStepBuilderFactory managerStepBuilderFactory;

        @Bean
        public TaskletStep managerStep() {
            return this.managerStepBuilderFactory.get("managerStep")
                       .chunk(100)
                       .reader(itemReader())
                       .outputChannel(requests()) // requests sent to workers
                       .inputChannel(replies())   // replies received from workers
                       .build();
        }

        // Middleware beans setup omitted

    }

    @Configuration
    public static class WorkerConfiguration {

        @Autowired
        private RemoteChunkingWorkerBuilder workerBuilder;

        @Bean
        public IntegrationFlow workerFlow() {
            return this.workerBuilder
                       .itemProcessor(itemProcessor())
                       .itemWriter(itemWriter())
                       .inputChannel(requests()) // requests received from the manager
                       .outputChannel(replies()) // replies sent to the manager
                       .build();
        }

        // Middleware beans setup omitted

    }

}你可以在这里找到远程分块作业的完整示例。
远程分区
下图显示了典型的远程分区情况:
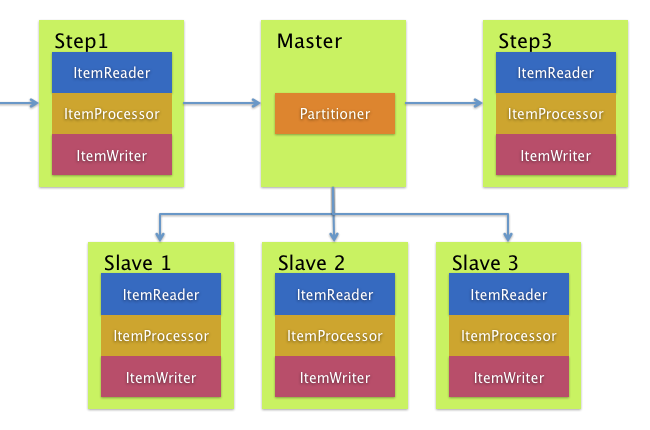
另一方面,远程分区在以下情况下很有用
不是项目的处理,而是关联的 I/O
造成瓶颈。使用远程分区,您可以发送工作
到执行完整 Spring Batch 的工作程序
步骤。因此,每个 worker 都有自己的ItemReader,ItemProcessor和ItemWriter.为此,Spring Batch
集成提供了MessageChannelPartitionHandler.
此PartitionHandler接口用途MessageChannel实例设置为
向远程工作人员发送说明并接收他们的响应。
这为传输(例如 JMS
和 AMQP)用于与远程工作人员通信。
“可扩展性”一章中介绍远程分区的部分概述了这些概念和
组件,并显示
使用默认TaskExecutorPartitionHandler到 partition
在单独的本地执行线程中。用于远程分区
对于多个 JVM,需要两个额外的组件:
-
远程处理结构或网格环境
-
一个
PartitionHandler支持所需 远程处理 Fabric 或 Grid 环境
与远程分块类似,您可以使用 JMS 作为“远程处理结构”。在这种情况下,请使用
一个MessageChannelPartitionHandler实例作为PartitionHandler实现
如前所述。
-
Java
-
XML
以下示例假定一个现有的分区作业,并重点介绍MessageChannelPartitionHandler和 Java 中的 JMS 配置:
/*
 * Configuration of the manager side
 */
@Bean
public PartitionHandler partitionHandler() {
    MessageChannelPartitionHandler partitionHandler = new MessageChannelPartitionHandler();
    partitionHandler.setStepName("step1");
    partitionHandler.setGridSize(3);
    partitionHandler.setReplyChannel(outboundReplies());
    MessagingTemplate template = new MessagingTemplate();
    template.setDefaultChannel(outboundRequests());
    template.setReceiveTimeout(100000);
    partitionHandler.setMessagingOperations(template);
    return partitionHandler;
}

@Bean
public QueueChannel outboundReplies() {
    return new QueueChannel();
}

@Bean
public DirectChannel outboundRequests() {
    return new DirectChannel();
}

@Bean
public IntegrationFlow outboundJmsRequests() {
    return IntegrationFlow.from("outboundRequests")
            .handle(Jms.outboundGateway(connectionFactory())
                    .requestDestination("requestsQueue"))
            .get();
}

@Bean
@ServiceActivator(inputChannel = "inboundStaging")
public AggregatorFactoryBean partitioningMessageHandler() throws Exception {
    AggregatorFactoryBean aggregatorFactoryBean = new AggregatorFactoryBean();
    aggregatorFactoryBean.setProcessorBean(partitionHandler());
    aggregatorFactoryBean.setOutputChannel(outboundReplies());
    // configure other propeties of the aggregatorFactoryBean
    return aggregatorFactoryBean;
}

@Bean
public DirectChannel inboundStaging() {
    return new DirectChannel();
}

@Bean
public IntegrationFlow inboundJmsStaging() {
    return IntegrationFlow
            .from(Jms.messageDrivenChannelAdapter(connectionFactory())
                    .configureListenerContainer(c -> c.subscriptionDurable(false))
                    .destination("stagingQueue"))
            .channel(inboundStaging())
            .get();
}

/*
 * Configuration of the worker side
 */
@Bean
public StepExecutionRequestHandler stepExecutionRequestHandler() {
    StepExecutionRequestHandler stepExecutionRequestHandler = new StepExecutionRequestHandler();
    stepExecutionRequestHandler.setJobExplorer(jobExplorer);
    stepExecutionRequestHandler.setStepLocator(stepLocator());
    return stepExecutionRequestHandler;
}

@Bean
@ServiceActivator(inputChannel = "inboundRequests", outputChannel = "outboundStaging")
public StepExecutionRequestHandler serviceActivator() throws Exception {
    return stepExecutionRequestHandler();
}

@Bean
public DirectChannel inboundRequests() {
    return new DirectChannel();
}

public IntegrationFlow inboundJmsRequests() {
    return IntegrationFlow
            .from(Jms.messageDrivenChannelAdapter(connectionFactory())
                    .configureListenerContainer(c -> c.subscriptionDurable(false))
                    .destination("requestsQueue"))
            .channel(inboundRequests())
            .get();
}

@Bean
public DirectChannel outboundStaging() {
    return new DirectChannel();
}

@Bean
public IntegrationFlow outboundJmsStaging() {
    return IntegrationFlow.from("outboundStaging")
            .handle(Jms.outboundGateway(connectionFactory())
                    .requestDestination("stagingQueue"))
            .get();
}以下示例假定一个现有的分区作业,并重点介绍MessageChannelPartitionHandler和 XML 中的 JMS 配置:
<bean id="partitionHandler"
   class="org.springframework.batch.integration.partition.MessageChannelPartitionHandler">
  <property name="stepName" value="step1"/>
  <property name="gridSize" value="3"/>
  <property name="replyChannel" ref="outbound-replies"/>
  <property name="messagingOperations">
    <bean class="org.springframework.integration.core.MessagingTemplate">
      <property name="defaultChannel" ref="outbound-requests"/>
      <property name="receiveTimeout" value="100000"/>
    </bean>
  </property>
</bean>

<int:channel id="outbound-requests"/>
<int-jms:outbound-channel-adapter destination="requestsQueue"
    channel="outbound-requests"/>

<int:channel id="inbound-requests"/>
<int-jms:message-driven-channel-adapter destination="requestsQueue"
    channel="inbound-requests"/>

<bean id="stepExecutionRequestHandler"
    class="org.springframework.batch.integration.partition.StepExecutionRequestHandler">
  <property name="jobExplorer" ref="jobExplorer"/>
  <property name="stepLocator" ref="stepLocator"/>
</bean>

<int:service-activator ref="stepExecutionRequestHandler" input-channel="inbound-requests"
    output-channel="outbound-staging"/>

<int:channel id="outbound-staging"/>
<int-jms:outbound-channel-adapter destination="stagingQueue"
    channel="outbound-staging"/>

<int:channel id="inbound-staging"/>
<int-jms:message-driven-channel-adapter destination="stagingQueue"
    channel="inbound-staging"/>

<int:aggregator ref="partitionHandler" input-channel="inbound-staging"
    output-channel="outbound-replies"/>

<int:channel id="outbound-replies">
  <int:queue/>
</int:channel>

<bean id="stepLocator"
class="org.springframework.batch.integration.partition.BeanFactoryStepLocator" />您还必须确保分区handlerattribute 映射到partitionHandler豆。
-
Java
-
XML
以下示例映射分区handler属性设置为partitionHandler在
Java:
	public Job personJob(JobRepository jobRepository) {
		return new JobBuilder("personJob", jobRepository)
				.start(new StepBuilder("step1.manager", jobRepository)
						.partitioner("step1.worker", partitioner())
						.partitionHandler(partitionHandler())
						.build())
				.build();
}以下示例映射分区handler属性设置为partitionHandler在
XML:
<job id="personJob">
  <step id="step1.manager">
    <partition partitioner="partitioner" handler="partitionHandler"/>
    ...
  </step>
</job>您可以在此处找到远程分区作业的完整示例。
您可以使用@EnableBatchIntegration注解来简化远程
partitioning 设置。此 Comments 提供了两个对远程分区有用的 bean:
-
RemotePartitioningManagerStepBuilderFactory:配置管理器步骤 -
RemotePartitioningWorkerStepBuilderFactory:配置 worker 步骤
这些 API 负责配置许多组件,如下图所示:
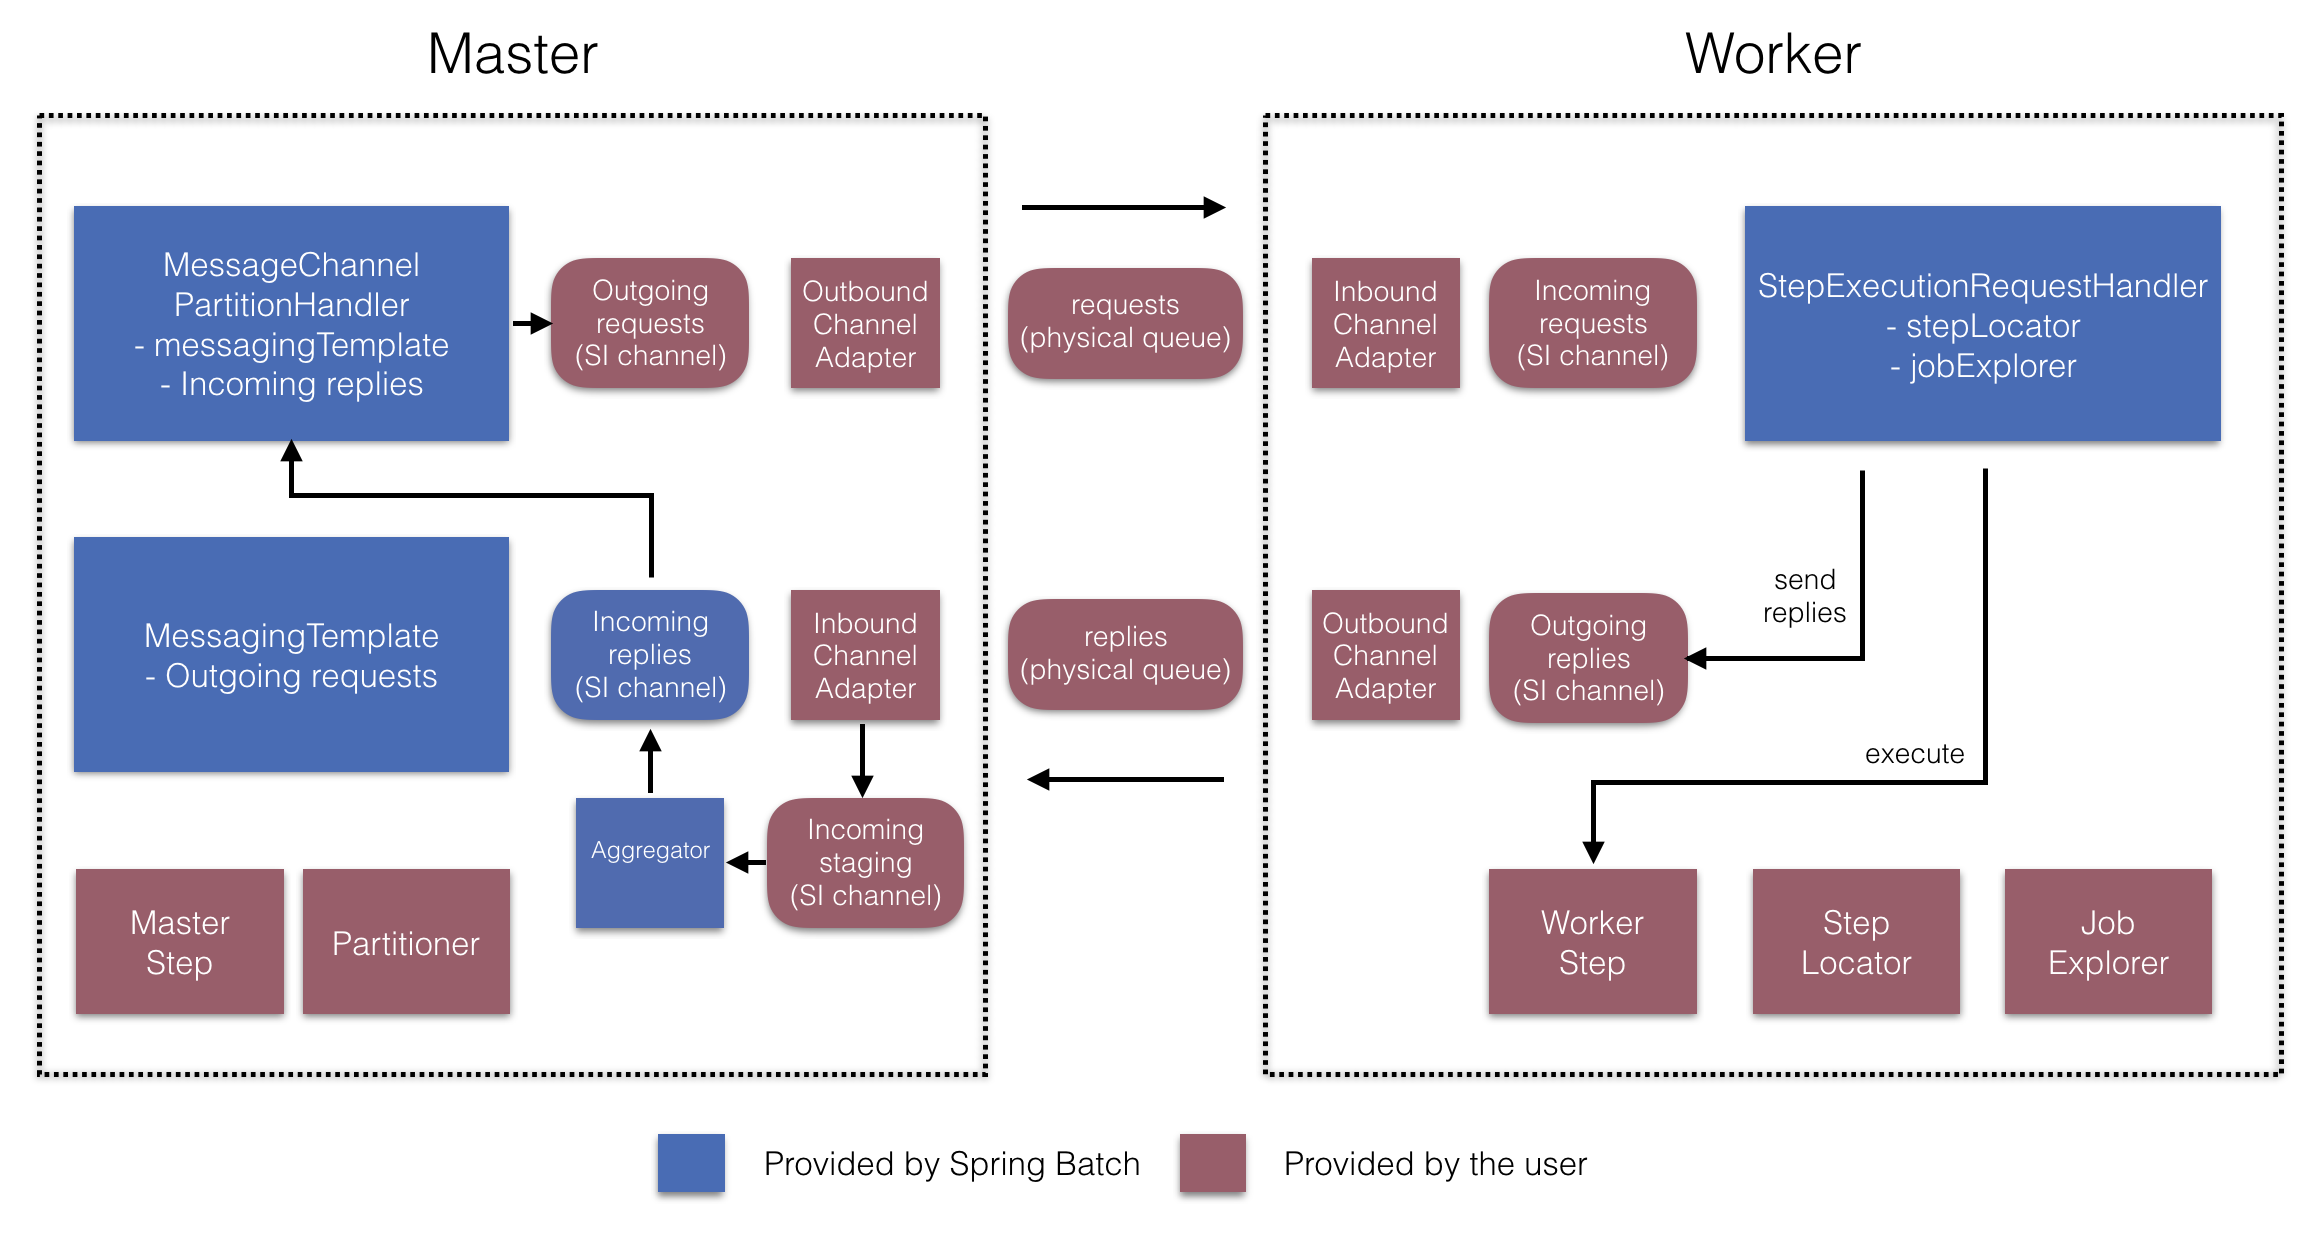
在 Manager 端,RemotePartitioningManagerStepBuilderFactory让您
通过声明来配置 Manager 步骤:
-
这
Partitioner用于对数据进行分区 -
向 worker 发送请求的输出通道(“传出请求”)
-
接收来自 worker 的回复的输入通道(“传入回复”)(配置回复聚合时)
-
轮询间隔和超时参数(配置作业存储库轮询时)
您无需显式配置MessageChannelPartitionHandler和MessagingTemplate.
(如果您找到理由,您仍然可以显式配置它们)。
在 worker 端,RemotePartitioningWorkerStepBuilderFactory允许您将 worker 配置为:
-
侦听 manager 在 input 通道上发送的请求(“Incoming requests”)
-
调用
handlemethod 的StepExecutionRequestHandler对于每个请求 -
将输出通道上的回复(“传出回复”)发送到管理器
您无需显式配置StepExecutionRequestHandler.
(如果您找到这样做的理由,您可以显式配置它)。
以下示例演示如何使用这些 API:
@Configuration
@EnableBatchProcessing
@EnableBatchIntegration
public class RemotePartitioningJobConfiguration {

    @Configuration
    public static class ManagerConfiguration {

        @Autowired
        private RemotePartitioningManagerStepBuilderFactory managerStepBuilderFactory;

        @Bean
        public Step managerStep() {
                 return this.managerStepBuilderFactory
                    .get("managerStep")
                    .partitioner("workerStep", partitioner())
                    .gridSize(10)
                    .outputChannel(outgoingRequestsToWorkers())
                    .inputChannel(incomingRepliesFromWorkers())
                    .build();
        }

        // Middleware beans setup omitted

    }

    @Configuration
    public static class WorkerConfiguration {

        @Autowired
        private RemotePartitioningWorkerStepBuilderFactory workerStepBuilderFactory;

        @Bean
        public Step workerStep() {
                 return this.workerStepBuilderFactory
                    .get("workerStep")
                    .inputChannel(incomingRequestsFromManager())
                    .outputChannel(outgoingRepliesToManager())
                    .chunk(100)
                    .reader(itemReader())
                    .processor(itemProcessor())
                    .writer(itemWriter())
                    .build();
        }

        // Middleware beans setup omitted

    }

}